young house idiots

We're renovating a house. And we're idiots.

interior paint colors


1 Comment

50 Shades of Beige

A few days ago, we met with Tara to go over our color palettes for our house. We wanted a look that gave a clean, airy feeling that would be both fashionable and functional.

Paint Color Scheme

To stay on budget, we are painting everything on our own. Every inch of wall, ceiling and trim in the house will be a lovely DIY experience.

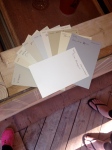
I wanted to share the colors we will be using in case you are like me and are prone to anxiety attacks anytime you attempt to choose paint swatches at Home Depot. So many choices and possibilities.

  • All Trim in House: Crisp Linen White

  Trim: Crisp Linen White - Paint Color Swatch

  • Cabinet/Fireplace: Gold Coast White
  • Kitchen: Natural Linen
  • Living Room/ Hall: Whispering WheatPaint Swatch colors main floor
  • Guest Room: White Sage
  • Upstairs Bath: Silver Birch
  • Master Bed: Navajo Sand
  • Master Closet: Pineapple Sorbet

    Paint Swatches Upstairs

  • Downstairs Bath: Shell White
  • Bonus Room (Downstairs): Banana Cream Pie
  • Laundry Room/Mud Room: Pebble GreyPaint Swatches Upstairs

Seriously Tara you are amazing. There is little chance that I would be able to compile all these colors to get the feeling we were looking for.  We love how all the colors seem very similar yet none of them are the same. It will allow each room to have different character while maintaining that bright, airy look throughout. Even Trent really got into this. He says he likes the beige one.

Below is a list of how many gallons we need for our 2100sf house as guidance for anyone thinking of painting their home’s interior. Our selected finishes include eggshell for the walls, matte for the ceiling, and gloss for the trim.

  • 5 Gallons of grey primer (kitchen and bonus room). Luckily, the previous owners painted the kitchen/ dining room a blood red color and put in wood panels in the bonus room. Both need a darker primer due to the darker color of it’s original state. Depending on the color of your walls currently, you may not need as much as we do.
  • 3 Gallons for living room/hall way
  • 3 Gallons ceiling paint. This paint is actually sold on the shelf already to go. You just need to have the paint experts shake it before you use it. Simple enough.
  • 2 Gallons for bonus room. Tara has informed us painting wood panels will not be fun. It apparently takes a ton of paint. Hooray.
  • 1 Gallon for all other rooms (8 other rooms)
  • 1 Gallon for Trim.

Yeah. That’s right. 22 gallons of paint. Jealous? I’m really hoping nothing can be more annoying than our DIY tile job.

Do you have any painting tips before we let the fun begin?

Cracking a cast iron tub


3 Comments

Tub Thumping

Have you ever had the opportunity to fight an armored gladiator to the death in a coliseum and then turn to the stunned spectators to ask whether they have found your actions amusing?

Are-You-Not-Entertained-Gladiator

Me either.

But recently, I did don this same ancient Roman garb when presented with the opportunity to demolish the cast iron bathtub in our house. If you’ve never had a chance to determine whether or not you are literally stronger than iron (it turns out I am), I highly recommend you try smashing a tub. It doesn’t even have to be a tub you need to demolish – just go find a tub in your friend’s or parent’s place and sneak in a sledgehammer. Trust me, they will forgive you when they see how powerful you are.

For a few pointers on how you can overcome the strength of one of the hardest materials known to man,* keep reading below. Special thanks to Tara for the heads up on how to tackle this – this isn’t exactly the safest task in the world.

Tools and Gear You’ll Need:

  • 12-lb. sledgehammer
  • Mason’s club hammer (I prefer the steel Blacksmith hammer – it’s like a pointy, child-size sledgehammer)
  • Old blanket or cloth tarp
  • Safety goggles
  • Earplugs or other hearing protection
  • Respirator (optional – depends how much you mind breathing tub dust)
  • Strong arms or additional personnel to help you haul off the scraps

Step 1: Remove the glass doors and the poorly installed frame. This requires a small amount of brains and a screwdriver. Easy enough that I won’t bother explaining. Just don’t drop the glass doors on the tile floor. They are heavy and tile and glass don’t play nice.

Bathroom Renovation - Tub Demo

Step 2: Wet the blanket or tarp and lay it over as much of the tub as possible, making sure to cover the outer edge completely. This will keep porcelain and iron shards from flying all over the place. Like in your mouth and eyeballs.

Step 3: Use the Mason’s Club or Blacksmith hammer to crack the center of the outer rim. You will feel like you are hitting it insanely hard. The tub will laugh at you. Keep smashing. If you have space in the bathroom, you can try to use the 12-lb. sledgehammer but be wary of nearby walls, sinks, etc. Once the outer rim is cracked, continue to smash along the tub’s equator until you’ve effectively split it in half. Like so:

Cracking a cast iron tub

Step 4: Continue to smash the now weakened tub into pieces small enough that you can carry with your exhausted arms. Notice below I’m using the big-boy hammer at this point. What you can’t see is that I’m sweating profusely and struggling to breathe through my Peters Sarsgaard-brand SARS-guard. It’s also important to keep using the wet blanket each time you swing the hammer as a precaution. It’s annoying but believe me – there’s a lot of sharp debris flying around.

IMG_20140112_192352_107 IMG_20140112_192401_201

Step 5: Seriously, be careful swinging sledgehammers in tight spaces. Thankfully we’re going to be getting rid of the sink too. Turns out I’m a little smash-happy.

Accidental Sink Smashing

Step 6: Finish what you started, revealing some sort of animal nest that has been constructed between the tub and the studs. Raise the animal as your own. Hope that it produces eggs or milk that can be consumed for nutrition.

IMG_20140112_195847_692

Step 7: Tear off your Hulk-a-Mania tank top and let the world see what you’ve done.

*Not an actual fact – there are many materials harder than iron. I’m one of them.