young house idiots

We're renovating a house. And we're idiots.


Leave a comment

Renovation Updates

It has been super exciting seeing our house transform. Everyday it looks a little bit closer to being finished.

Here is the beginning of the bathroom demo on the upstairs bathroom:

                          Bath Demo1

     Bathroom Demo 2

Everything is demo-ed now and below you can see they have put up the dry walls. They are beginning to tile and we have our built in shower self. Also our new tub is in. Thank god the old tub is gone!

Upstairs Bath Tile

Here is a closer look of the shelf:

IMG_7733

Here is the downstairs bath. They removed all the tile on the floor – except around the toilet. Eventually it will obviously all come out.  I can’t wait to see what it looks like with the new tile we picked out! 
Downstairs Bathroom

No worries- more to come!


Leave a comment

Oh Sweet Tile O’ Mine…..Part II.

Listen. I can’t let Trent take all the glory for this job. He slave-labored me into manning this monster for about 4 straight hours.

IMG_7603

Evidently, it was too much tool for him. 

Watch out Nicole Curtis, I may be the next Rehab Addict.


1 Comment

I Can’t Put My Arms Down

I’m originally from Ohio. Dealing with cold weather is what we Ohio-ans know best. However, once you have left the North, you start to realize just how freaking cold it is. Having been in the South for several years, I have lost my cold-weather conditioning. I have become a complete wuss when it comes to cold weather. Anything below 40 degrees makes me, along with the rest of Charlotte, shut down completely.

As luck would have it, the week that Piedmont Natural Gas was scheduled to turn on the heat in the new house, Charlotte was experiencing record-breaking low temperatures. Piedmont was scheduled to arrive that day somewhere inside the narrow window between 8am-12pm. Perfect.

Trent just so happened to have an “extremely busy” day helping other lucky clients buy and sell houses and was not able to keep me company while waiting for the technician. Shocking.

Never one to lose hope, I showed up at 8:00 am sharp. I recalled my frigid Ohio upbringing, and I came prepared to deal with the weather:

I can't move my arms!

To reiterate, when cold weather hits any southern city, it causes panic comparable to what I imagine would be brought on by a zombie apocalypse. Piedmont Gas had a gazillion emergencies and even though I was bordering on hypothermia, these other emergencies took priority. No worries though, Piedmont did show up. Around 2:30pm. Right on time.

Luckily, yard work kept me warm and busy while waiting.  I did find some silver linings to this icy day and have a few tips if you run into this situation.

Silver Linings

  • Raking leaves in freezing temperatures has it’s benefits. Though I wasn’t able to actually “rake” the leaves, I could, however, use a shovel to pick up piles of frozen stuck together leaf clumps and put them into the bags . This is actually very efficient for clearing piles of leaves. Sorry there is no photographic documentation of this effort as my arms had frozen from the elbow down. Side note: do not fill the bags all the way. Frozen/wet leaves are super heavy.
  • Waiting 6.5 hours for a technician allows you to get some serious yard work done – 30 bags of leaves and the early stages of of tackling the monkey grass. Seriously, wtf is monkey grass? It doesn’t even smell like a monkey.

Monkey Grass 1

  •  Trying to thaw your body out in freezing temps by doing yard work turns out to be a great work out. I’m seriously going to be so buff.
  • My technician was awesome sauce – which allowed me to forget how much I cursed at Piedmont in my head all day and swore to hate-blog about them when I got home. He was incredibly informative and shared some great stories about his past life as a baseball player. We bonded, and it made my day.

Tips 

  1. When scheduling your appointment, ask the company where you are on their schedule. Are you scheduled at the very beginning of the day and definitely need to be there at 8 AM or are you near the end and should consider taking a day trip to Belize prior to their arrival? Also ask if they can give you a 30 minute warning phone call before they arrive. They will chuckle and say no, but it’s worth it to ask and laugh along.
  2. Be prepared for the weather.  The night before, you should check out the weather report. Nothing is worse than waiting for hours on end and also being physically uncomfortable.
  3. Have a plan to stay busy while waiting. Time goes by much quicker when you mentally prepare for the situation and plan additional chores and honey-dos. This way the time you are waiting for the technician will not be wasted time.
  4. Have the company’s phone number on hand in case you need to call when you start to wonder whether the cold weather has gone to your head and you simply imagined that they told you they would be there within that four-hour window. They can tell you if the technician is running on time or running late. Spoiler alert: they’re running late.
  5. Patience, patience, patience. It is no fun waiting hours on end for technicians. I know it sucks. But it helps to look at their side. They aren’t having fun either and being nasty on the phone or in person will not help anyone out. Trust me, I tried it.

Trent’s Tips

  1. Make sure you have a girlfriend when scheduling appointments with vendors. Waiting for any vendor is not fun. Unless they’re bringing pizza. And even those guys now have an online tracker that gives up-to-the-minute details on when that pizza will be in your mouth. On the day the gas guy is supposed to come, ensure you fill your day with endless meetings in climate-controlled rooms and apologize profusely to your girlfriend for the unfortunate scheduling conflict. Try to look sincere.
  2. Ask the gas company to describe their technician’s general appearance. Ask for a sketch-artist level of detail. No matter how late he is, if he is an ex-baseball player with lots of stories and helpful, gassy advice for your girlfriend, you’re gonna be pretty gosh-darn grumpy when you find out he looks like this:

Ryan Gosling Stole My Girlfriend


Cracking a cast iron tub


3 Comments

Tub Thumping

Have you ever had the opportunity to fight an armored gladiator to the death in a coliseum and then turn to the stunned spectators to ask whether they have found your actions amusing?

Are-You-Not-Entertained-Gladiator

Me either.

But recently, I did don this same ancient Roman garb when presented with the opportunity to demolish the cast iron bathtub in our house. If you’ve never had a chance to determine whether or not you are literally stronger than iron (it turns out I am), I highly recommend you try smashing a tub. It doesn’t even have to be a tub you need to demolish – just go find a tub in your friend’s or parent’s place and sneak in a sledgehammer. Trust me, they will forgive you when they see how powerful you are.

For a few pointers on how you can overcome the strength of one of the hardest materials known to man,* keep reading below. Special thanks to Tara for the heads up on how to tackle this – this isn’t exactly the safest task in the world.

Tools and Gear You’ll Need:

  • 12-lb. sledgehammer
  • Mason’s club hammer (I prefer the steel Blacksmith hammer – it’s like a pointy, child-size sledgehammer)
  • Old blanket or cloth tarp
  • Safety goggles
  • Earplugs or other hearing protection
  • Respirator (optional – depends how much you mind breathing tub dust)
  • Strong arms or additional personnel to help you haul off the scraps

Step 1: Remove the glass doors and the poorly installed frame. This requires a small amount of brains and a screwdriver. Easy enough that I won’t bother explaining. Just don’t drop the glass doors on the tile floor. They are heavy and tile and glass don’t play nice.

Bathroom Renovation - Tub Demo

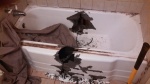
Step 2: Wet the blanket or tarp and lay it over as much of the tub as possible, making sure to cover the outer edge completely. This will keep porcelain and iron shards from flying all over the place. Like in your mouth and eyeballs.

Step 3: Use the Mason’s Club or Blacksmith hammer to crack the center of the outer rim. You will feel like you are hitting it insanely hard. The tub will laugh at you. Keep smashing. If you have space in the bathroom, you can try to use the 12-lb. sledgehammer but be wary of nearby walls, sinks, etc. Once the outer rim is cracked, continue to smash along the tub’s equator until you’ve effectively split it in half. Like so:

Cracking a cast iron tub

Step 4: Continue to smash the now weakened tub into pieces small enough that you can carry with your exhausted arms. Notice below I’m using the big-boy hammer at this point. What you can’t see is that I’m sweating profusely and struggling to breathe through my Peters Sarsgaard-brand SARS-guard. It’s also important to keep using the wet blanket each time you swing the hammer as a precaution. It’s annoying but believe me – there’s a lot of sharp debris flying around.

IMG_20140112_192352_107 IMG_20140112_192401_201

Step 5: Seriously, be careful swinging sledgehammers in tight spaces. Thankfully we’re going to be getting rid of the sink too. Turns out I’m a little smash-happy.

Accidental Sink Smashing

Step 6: Finish what you started, revealing some sort of animal nest that has been constructed between the tub and the studs. Raise the animal as your own. Hope that it produces eggs or milk that can be consumed for nutrition.

IMG_20140112_195847_692

Step 7: Tear off your Hulk-a-Mania tank top and let the world see what you’ve done.

*Not an actual fact – there are many materials harder than iron. I’m one of them.

Quick Leaf Bagging Tricks


Leave a comment

You Leaf-Bagging Son of a B*tch

Hi. Our names are Trent and Alyssa. And we have a leaf problem. Every time we seem to get control of it, somehow the leaves just show up. It’s not that we want them to – we just can’t help it. We’ve tried to quit. But it seems hopeless. The meetings seem to be helping…

Below you’ll find a step by step guide to Alyssa’s leaf-bagging strategy. I think it’s pretty genius, but that could be simply because I’m partial to burritos. Nonetheless, I’ll be referring to Alyssa as Bagger Vance every autumn for the foreseeable future. I’ve told her she should go to the special school for leaf-bagging wizards: Bagwarts.

Tools and Gear You’ll Need:

  • Ryobi Lawn & Leaf Bag
  • Small Tarp
  • Rake
  • 55-Gallon Contractor Bags
  • Gloves (only if your hands aren’t already hardened like those of a grizzled sailor)

Step 1: Set up your Ryobi Lawn and Leaf Bag

DSC01770

Step 2: Get a small tarp – this is a 6′ x 8′ tarp* folded in halvsies. Put it on the ground. Beside the leaves.

DSC01759

Step 3: Rake the leaves onto the tarp. It is usually better to have your wife or girlfriend do this while you take photos and drink a beer.

DSC01760

Step 4: Pick up the corner of the tarp to roll it up. Like a burrito.

DSC01761

Step 5:  Start making that leaf burrito.

DSC01762

Step 6: Pick up that delicious deciduous delicacy

DSC01764

Step 7: Put the whole thing in the Ryobi bag.

DSC01765

Step 8: Pull up the sides of the plastic bag to prevent spillage.

DSC01766

Step 9: Pull out the tarp, relegating those leaves to a bewildered state. Stupid leaves.

DSC01768

Still confused, dum-dum? Check out the video for more heart-pounding action:

*Note: I say the tarp is a 9′ x 12′ in the video. I lied. It’s a 6′ x 8′.