young house idiots

We're renovating a house. And we're idiots.

Trash Man Danny Devito


1 Comment

This stinks….

If you remember our deck demo, we had a pile of old pressure-treated wood of which we needed to dispose. I’m not sure if there is an easy way to do so other than outsource it which would cost us $300-$400. To stay under budget, we decided this was a DIY project.

We do not have a truck and didn’t feel like bothering our friends that had one (Amy & Kurtis – we used your truck to pick up our dining table and didn’t have time for this job), so we rented a U-Haul. Yep. U-Hauls double as dump trucks when you want them to.  As you can see below, Trent, at 9am, is just ecstatic to begin this day and is equally ecstatic I’m documenting his emotions. Can you tell he’s not a morning person?

Trent Driving the uHaul

After picking up the U-Haul, we then had to very carefully load the truck with the wood.  And by wood, I mean pieces of rotten deck with handfuls of rusty nails sticking out of them.

The fun didn’t stop there. Now that our stack of wood was picked up and put into the truck, it was time to dump it.

Deck Renovation and Demolition with U-Haul

There’s an entire 250 square foot deck in there!

I had never been to the dump before, and having done this once now, I don’t hope to go back anytime soon. If you’ve never been, it’s actually quite an interesting place. It’s something to experience and check off your list, but once you do, never go back.  Think of when you’re on the beach and you look out beyond the water and there isn’t an end in sight. It’s just like that – only instead of glorious ocean water, it’s less-than-glorious trash – miles and miles of trash.

Emptying the uHaul was actually much harder than loading it. The space in which we had to move was much smaller and  some sort of monster moon-plow (earthmover) would pull up a few feet from you to sweep the trash away like it was matchsticks. Terrifying/Awesome.

disposing construction material at the dump

Here is the video to show you how close this actually was.

Piece by rusty nailed piece of wood we eventually got the job done and without any injuries.


Trent disposing deck wood at the dump

Total cost breakdown of this job: $150

  • Uhaul: $80
  • Disposal fee at the dump: $50
  • Gas: $20

By doing it ourselves, we saved about $200. #WorthIt.

closet renovation


Leave a comment

Guest Bedroom Small Closet Solution

One of our concerns with our house was the lack of closet space in the second bedroom. If you remember from our before pictures of the house, the closet in the guest bedroom was pretty small. 
Guest Bedroom Closet

After talking it over with B&G, we luckily found a great solution to this small closet problem. In the master bedroom, there are two small closets on the wall that is shared with the second bedroom. You can see in the picture below, one of the smaller closets on the far right corner of the master.

Master Bedroom with two small closets on side wall

We figured since we are putting a walk-in closet in the master, we wouldn’t need those smaller closets. So B&G began turning one of those closets we didn’t need, into a bigger closet for the guest bedroom. Below this is a view from the guest bed room looking into the master.

Guestbed Closet Before

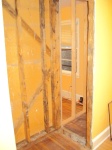
Below you can see the progress. The first picture is the view from the guest bedroom and the second is the view from the master bedroom. You can see they knocked out the wall in the guest bedroom to make the closet double the size. They also dry walled the back of the closet.

Closet2back of closet

Here are the closet doors:

Closet1

Now the second bedroom has twice the closet space it did before – success!

dog playing in leaves puppy photo


Leave a comment

It’s going down…I’m yelling TIMBER

One of our first big demo projects was taking down the deck. Unfortunately, it seemed to have been another DIY project by the previous owner. The deck wasn’t up to code and parts of it were rotted and unstable – basically the opposite of safe. It had to go.

Deck Before

Trent and I decided we would do the demo on our own to save some money. Plus it looked like fun.

We started by buying “his and hers” sledgehammers from Home Depot because we are super romantic. There are many online videos describing how to demolish a deck, but come on, it seemed pretty simple. Similar to Trent’s tub thumpingwe just figured the best idea would be to just smash it up.

As you can tell from this video clip, I was a huge help during the demolition – Trent’s encouraging cheers brought me enough adrenaline to knock down this one already-wobbly piece of wood. You may notice how strong I am.

After I swung my lady-hammer a couple times, I returned to my womanly duty of raking leaves . Trent did the rest of the deck because his ego is fragile and he requires constant validation of his manhood. Below is a picture of the top of the deck post-smash.

Deck Demo

The hard hat was probably not necessary but removing some of the supports from under the deck could have caused the whole thing to come down on top of Trent. While hilarious, that would have been ugly. I don’t know that the hard hat would have offered much protection, but the peace of mind was worth it.
Deck1

Don’t let the pictures fool you. I wasn’t completely useless during this process. I helped move pieces of wood to a stack in the driveway. Mule-work you say? Why yes then, I did mule-work.

Side note: if you are doing this at home, please wear gloves. I’m not sure if we were experiencing a normal amount of rusty nails holding this deck together,  but a rusty nail in the hand would be a miserable end to an otherwise glorious DIY day.We decided to haul off the wood on our own to save money so we tried to neatly stack it. Evidently you can’t just stack up pressure-treated wood and light it on fire any more. Thanks for nothing, Al Gore.

Here is the beginning of our stack – guess which side I started stacking on. If you guess the side that is thrown into a big pile with no known organization, you would be correct.

IMG_0118

Presley was obviously a huge help to us during this process. IMG_7313

And drum roll…… we are finally finished with the demo! Now we can walk out of our kitchen to an untimely demise. Perfect.

IMG_7492

interior paint colors


1 Comment

50 Shades of Beige

A few days ago, we met with Tara to go over our color palettes for our house. We wanted a look that gave a clean, airy feeling that would be both fashionable and functional.

Paint Color Scheme

To stay on budget, we are painting everything on our own. Every inch of wall, ceiling and trim in the house will be a lovely DIY experience.

I wanted to share the colors we will be using in case you are like me and are prone to anxiety attacks anytime you attempt to choose paint swatches at Home Depot. So many choices and possibilities.

  • All Trim in House: Crisp Linen White

  Trim: Crisp Linen White - Paint Color Swatch

  • Cabinet/Fireplace: Gold Coast White
  • Kitchen: Natural Linen
  • Living Room/ Hall: Whispering WheatPaint Swatch colors main floor
  • Guest Room: White Sage
  • Upstairs Bath: Silver Birch
  • Master Bed: Navajo Sand
  • Master Closet: Pineapple Sorbet

    Paint Swatches Upstairs

  • Downstairs Bath: Shell White
  • Bonus Room (Downstairs): Banana Cream Pie
  • Laundry Room/Mud Room: Pebble GreyPaint Swatches Upstairs

Seriously Tara you are amazing. There is little chance that I would be able to compile all these colors to get the feeling we were looking for.  We love how all the colors seem very similar yet none of them are the same. It will allow each room to have different character while maintaining that bright, airy look throughout. Even Trent really got into this. He says he likes the beige one.

Below is a list of how many gallons we need for our 2100sf house as guidance for anyone thinking of painting their home’s interior. Our selected finishes include eggshell for the walls, matte for the ceiling, and gloss for the trim.

  • 5 Gallons of grey primer (kitchen and bonus room). Luckily, the previous owners painted the kitchen/ dining room a blood red color and put in wood panels in the bonus room. Both need a darker primer due to the darker color of it’s original state. Depending on the color of your walls currently, you may not need as much as we do.
  • 3 Gallons for living room/hall way
  • 3 Gallons ceiling paint. This paint is actually sold on the shelf already to go. You just need to have the paint experts shake it before you use it. Simple enough.
  • 2 Gallons for bonus room. Tara has informed us painting wood panels will not be fun. It apparently takes a ton of paint. Hooray.
  • 1 Gallon for all other rooms (8 other rooms)
  • 1 Gallon for Trim.

Yeah. That’s right. 22 gallons of paint. Jealous? I’m really hoping nothing can be more annoying than our DIY tile job.

Do you have any painting tips before we let the fun begin?


1 Comment

Light, Space & Time

So here in Charlotte, we are snowed in.

IMG_20140213_141734_451

Good news: it’s beautiful outside. Bad news: I have too much time to shop online for housewares. We need to buy about six more lighting fixtures, and there seems to be an ever-expanding number of choices. Every time I begin to look at different lighting websites I fall into some what of a ceiling light stargate, where all sense of space and time becomes distorted and where I can lose hours, even days, of my life.

I have spent a disgusting amount of time obsessing over lights, and I am not ashamed to admit it. Lighting isn’t cheap, so comparing prices and finding lighting fixtures that I like for a  price that will keep me on budget can get a little tricky, but it’s absolutely necessary.

Have you been looking for lighting for your home? Below is a list of some of my favorite sites to find good deals on cool lights. Maybe you can avoid the wormhole better than I.

Websites for lighting fixtures:

Different Styles

  • Flush Mount – Fit snug against the ceiling so you don’t see anything between light and ceiling. These show very little. They are the nuns of lighting fixtures.
  • Semi-Flush Mount – These tend to be off the ceiling a few inches. Still classy, these lights show a little leg.
  • Chandeliers – High-class ladies of the night, these lights are all flash and leave nothing to the imagination. But we’re still drawn to them. And willing to pay.
  • Drum Pendant – These hang low. They have a tendency to wobble to and fro. They also look like drums.
  • Bowl Pendant – Same as drum pendants, but these look like bowls. No surprises here.

I ended up purchasing quite a few of the semi-flush mounts for rooms throughout the house, and a chandelier for the master walk in closet. Below are all of the lights for the house that I purchased thus far.

MasterCloset4                                               MasterBedLight3 LivingRoomLight6                                  laundryroomlight2 Bonus Room                                     West Elm Large Rectangle Hanging Capiz Pendant Light White     GuestBedLight5                                         KitchenLight

Do you have any recommendations for good places to find inexpensive lighting fixtures? Tell us – we’d love to share your ideas.


1 Comment

Upstairs Bathroom Tile Updates

I can’t tell you how excited I am about this shower.  We used white subway tile and for the border, I ordered grey penny round tile from Overstock.
Bathroom Shower Tile

They started on the floor tile as well. We went with a white tile that has hues of grey which goes really well with the penny round tile in the shower.

IMG_7771 Tara brought paint swatches to go over the color scheme of the house. We talked about using airy, neutral and clean colors. I am in love. What do you think?

Colors


Leave a comment

Renovation Updates

It has been super exciting seeing our house transform. Everyday it looks a little bit closer to being finished.

Here is the beginning of the bathroom demo on the upstairs bathroom:

                          Bath Demo1

     Bathroom Demo 2

Everything is demo-ed now and below you can see they have put up the dry walls. They are beginning to tile and we have our built in shower self. Also our new tub is in. Thank god the old tub is gone!

Upstairs Bath Tile

Here is a closer look of the shelf:

IMG_7733

Here is the downstairs bath. They removed all the tile on the floor – except around the toilet. Eventually it will obviously all come out.  I can’t wait to see what it looks like with the new tile we picked out! 
Downstairs Bathroom

No worries- more to come!


1 Comment

Countertop Debacle

Thank you everyone who participated in our poll.  I thought that would be a sure fire way for an indecisive girl to get an answer. Turns out, I’m still indecisive.

I stewed over these choices for hours on end and forced my family and friends to personally tell me which one to get and why. Most everyone had different opinions. My brother picked out a color that wasn’t even in the poll and both of my sisters introduced me to two completely different countertop materials: soapstone and corian. I’ve included pictures since, if you’re like me, you may not be able to conjure up a mental image of these materials.

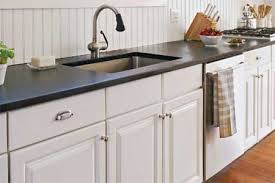
Soapstone – I love this look, but it’s a bit pricier and there’s a greater risk of chipping and scratching. Some call it character, but it made me nervous. Don’t recognize it? You might remember soapstone from high school chemistry lab tables. Yep, that’s it.soapstone

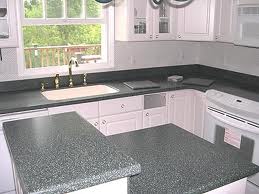
Corian – This engineered material, also called solid surface, is made of compressed materials. It’s definitely one of the most durable materials around and the price is right, too. Problem is, I don’t love the look. The right version can appear very similar to granite, but it just doesn’t have the same organic  look.

corian

After doing some research, we decided to stick with granite.

Home Depot was supposed to be having a sale on countertops: 10% off and free installation. This deal would put us under budget, which is always music to our ears.  We had until 2/4 to make a decision before the sale ended. Trent and I woke up the morning of the 4th without a decision, but we were optimistic we could make the right choice when the time came. We brought drawings of the kitchen dimensions, so we could get it quoted on the spot.  

Kitchen Drawing

We looked at the three choices we asked everyone to vote on, but none of those options felt … right. That’s when another one caught our eye. The stone pattern is called Moon White. 

Final Countertop

This is a step up in the group level of our original choices in the poll, but with the aforementioned discount we would still be under budget. We both really liked the more marbled look and lower contrast. The granularity of the Group A options had bothered me about the granite the whole time.

Having made our decision, you can imagine our surprise when the manager informed us the sale had ended two days before. The worst! I felt my anxiety skyrocket as we received the granite-dream-crushing news. Luckily, the manager saw the disappointment in our eyes and let us know we could still get 10% off if we opened a credit card. Since I’m in Home Depot about every day, this worked out perfectly (I’m going to pay the card off immediately, so please forego the personal debt lecture). It turned out to be a good day. We found a countertop we really wanted, and we’re still under budget. Victory.

Also wanted to give a quick shout out to Julie at the Home Depot on Wendover. You rock! (No granite pun intended.)

If any of you are debating countertops and would like more information on ratings, I found this link to be helpful. Or just leave a comment, and we will be happy to give our opinion or get more info from our Project Manager, Tara.

Idiots in the Dust


4 Comments

Oh, Oh, Oh, Oh, Sweet Tile O’ Mine

I’d never encountered this type of tile before. After this experience, I realize every time I see it again that if I stare too long, I’ll probably break down and cry. By the end, I felt much like Axl Rose now looks:

Axl Rose Looks Terrible

Seriously, Axl, maybe it’s time to give up the Navajo-blanket-turned-bathrobe look. Did you get that comped at Harrah’s Cherokee? Like a remote tribesman with an iPhone, another 80s icon has failed to cope with the forward march of time.

But I digress. This post is not about glorious ’80s rock stars and their not-so-glorious current state. No, this post is about something far more sinister. We’re here today to talk about my latest renovation nemesis: Saltillo tile.

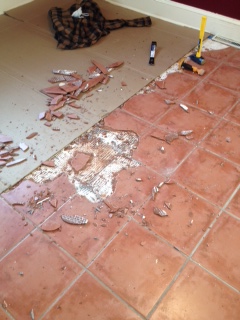
This villain goes by many names: Saltillo, terra cotta, Spanish tile (that’s racist, by the way – it originated in Mexico), or as I call it, Satan’s favorite floor covering. Not only did this reddish, clay tile look horrendous in our blood red dining/kitchen area next to the similarly red brick freplace, but it’s also got a real bad case of the crumbles.

Kitchen Tile Terracotta

With my spirits flying high from my utter domination of our old cast iron tub, I set out to tackle this Kraken.

It did not go well.

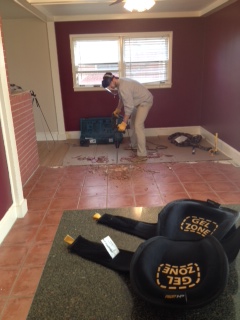
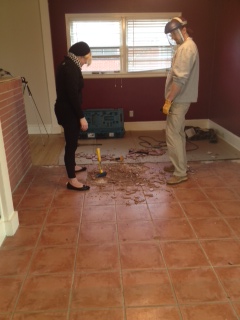
I went through a variety of tools, including the classic chisel-hammer-tap-tap method that you see weak-looking men doing with obnoxious ease all over YouTube. I quickly progressed to an electric hammer/chisel that was perhaps even less efficient (and certainly much louder). By the end, the method I found most effective was to use my trusty claw hammer and brute strength to smash the tile as much as possible and hope that the impact would cause the adhesive to release the majority of the tile instead of crumbling and leaving bits of terracotta all over our subfloor.

Did I mention that the adhesive used in this kitchen was not thin-set mortar but a stronger, stickier mastic? It was. Did I also mention the previous owner used what seemed to be a double layer of adhesive? He did. Evidently he felt there was great risk in this tile trying to escape.

Below are some pictures of how this went along with a video at the bottom. The audio in the video is somewhat terrible, but I tried to give captions and a summary of what is going on. I also sped up the hours that went by with me smashing so you don’t have to endure the full pain of watching me struggle.

If you’re going to try to do a Saltillo tile demo job yourself,  make sure you have the following items:

  • Chisel
  • Claw hammer
  • Good work gloves (very important – I wore through a pair of leather work gloves and, by the end, I had blisters on me fingers)
  • Eye protection (Dexter mask optional)
  • Ear protection
  • Respirator (spring for the good one – you’re gonna kick up a lot of earthy dust)
  • Patience
  • Repressed fury

My First attempts were slow and cautious. Little progress was made:

Removing a few tiles Electric chisel removing tile

Difficult Terracotta Tile Removal

Clearly I  was going to need to upgrade my equipment and efforts…

Dexter face shield

To make a long story short, here are the rest of the photos at various stages of destruction and exasperation:

Saltillo tile removal clean up Cleanup dust bowl dusty mess 2 dusty mess Finished Floor Finishing up photo 1 process 1 progress Respirator sledgehammer

If you’d like to watch the video, give it a go below. It’s funny now. It was not funny during the eight hours it took me to do this job. Estimated savings cost of doing this yourself: $1,000. Worth it? Jury is still out.